5 tips for sharp images at wide apertures – Ep.32
5 tips for sharp images at wide apertures – Ep.32
5 tips for sharp images at wide apertures – Ep.32


5 tips for sharp images at wide apertures
Today is all about how to achieve sharp images at wide apertures, especially with people. I am going to give you my top tips as this is something I do – a lot!
Here we are in episode 32! I just want to take a moment to give a shout out to a couple of people. First is Dave Bird who sent my a really kind message on facebook yesterday after listening to episode 30 on blurry backgrounds. He then left me a lovely review on Stitcher. Much appreciated Dave – thank you so much for listening.
Also a big hello to Bill Hoggard and Jane Myers who also both got in touch yesterday via email to introduce themselves. They have both joined my Auto to Manual course and are rearing to get started. If you would like to join too – it’s totally free and you can find it at www.autotomanual.com!
In episode 30 I zoned right in on how to achieve that blurry background and/or foreground in your photography. I hope it helped you to understand that there is so much more to this than opening your aperture wide. Focal length and distance matter too – maybe more!
So let’s say you are taking photographs of kids and you are after that smooth, creamy background blur. You know the look I mean right? So you now know that to really achieve that particular look you need to place your subjects a good distance away from their background, move close in to them, select a slightly longer focal length (my favourite is 85mm) and open your aperture wide.
So you do all of that. You are ready to shoot but you are going to have a very shallow depth of field. Remember that simply means that you have a very small section of your scene, from front to back, that is going to be in sharp focus.
If you have such a small section of your scene that is going to be in sharp focus, how do you make sure that all the parts of this image you want to be sharp, will actually be sharp?
Surely the margin for error with this shooting style is huge?
Well not if you know what you are doing. I am going to share my top tips with you. You will soon be shooting wide open even with groups of people and confident about the sharpness of your final images. Just wait!
Glass makes a difference
Have you heard photographers talk about ‘good glass’? What they are talking about is high quality lenses. Lenses are much more important than camera bodies when it comes to sharpness.
I hate to talk too much about expensive equipment because I know that most learners simply can’t justify spending four figures on a lens. However, it is important to mention that when it comes to creating sharp images at very wide apertures, the lens you use definitely makes a difference.
I have two 50mm lenses. I have my 50mm 1.8D which cost around £90 and my son and I use that with a Nikon D80. What a great little duo that is!
However, I also have the Nikon 50mm 1.4G which cost four times as much when I purchased it a few years back. I use that with my Nikon D700. The thing is, I rarely use that lens at f/1.4! I am more often shooting around f/2.
So why not just use my 50mm 1.8? Why do I even need the 1.4?
Because the 1.4 doesn’t just open wider, the glass and build quality is far superior to the 1.8 and you will notice a difference, especially when shooting at wide apertures.
I don’t tell you this to encourage you to go out and buy an expensive lens. Not at all! Your very reasonably priced nifty fifty lens will produce gorgeous, sharp images for you. But it will be softer at very wide apertures than it’s more expensive counterparts.
So if you want a very shallow depth of field with a cheaper lens but you still want your subject to be pin sharp – don’t open the lens to it’s widest aperture of f/1.8. Go for something a little bit narrower like f/2.2 to f/2.8 then use distance and focal length to blur out that background more.
Check out this episode for more on this
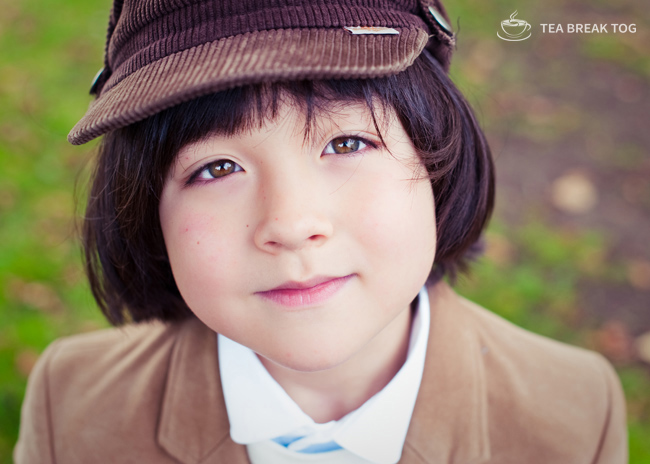
Make sure those eyes are level for close-up shots
If you are taking a close-up headshot of one person with a very shallow depth of field you need to be super careful.
Why? Because if the sharp section of your scene from front to back is very thin then it is easy to end up with softness in your image – in places where you don’t want it!
Imagine this close-up shot if you can. You have purposefully given yourself a very shallow depth of field to work with so that you can achieve a blurry background which doesn’t distract from your subject. What if your subject was not quite looking at you straight on? Let’s say they have turned their head just slightly around to the side.
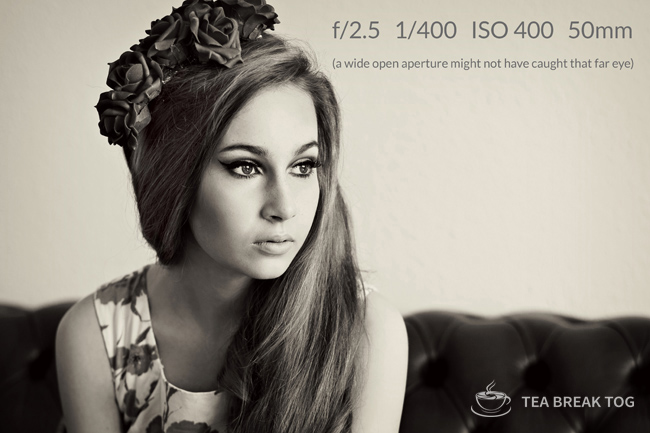
If you focus on the nearest eye (see number 4) it will be contained within your depth of field but the other may have moved out of it. That’s how shallow your area of sharp focus might be when you are taking a shot like this! That other eye won’t be in focus and in a close-up, that matters!
What is the solution? Make sure both eyes are level (easier said than done with kids, I know, but just take lots and you will manage one or two at least!)
If you increase your distance from your subject but keep the same settings, your depth of field increases too. You now have a much greater section of sharpness even though your aperture, focal length and all your other settings have remained the same. You now have the whole of your subject in the frame and you can be much less crazy about eyes being level because the entire body is probably now contained within your depth of field.
Make sure people are level with each other in group shots
Someone taught me years ago that I should narrow down my aperture as I add more people to my group shots. They told me that I should match my aperture number to the number of people in my shot.
Please believe me when I tell you this is absolute nonsense.
There is no reason whatsoever why you can’t capture a group with a wide aperture if you want to. I do it all the time. As long as you know how to do it – you will manage to capture everyone in a nice sharp image.
But first of all, make sure you are using a wide aperture for a group shot for good reason. Don’t do it just because you can. There are times when a blurred out background can look great for groups, especially families. I do this all the time. However, there are also times when this just wouldn’t make sense. Treat every situation separately.
But let’s say you do want a blurry background in your group shot. Just like with the eyes in the close-up portrait, it is all about keeping your group in line with each other.
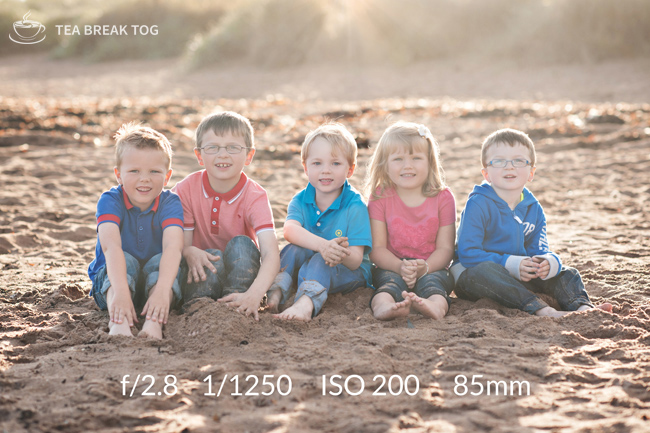
Depth of field is about ‘front to back’ not ‘side to side’. So, for example, if you are shooting with a very shallow depth of field and you have a family of four sitting on four different steps all at different distances from your camera – they won’t all be in focus. The person you focused on will be sharp but the others will be softer depending on how far back or forward they are from that person.
In theory, you could keep all of your settings the same and then move much further back. This would increase your depth of field and you might then get them all sharp. However, why bother? If you set up a group on a set of stairs and you want them all to be sharp – just narrow down your aperture. A shallow depth of field is not required!
I shoot family groups of 4, 5 and 6 at f/2 regularly. I get a little bit of distance so I can fit them all in and this gives me more than enough depth of field to contain them in as long as they are close and pretty level with each other. Opening my aperture like this also allows me to get a nice fast shutter speed meaning I can get them to interact and play and I am pretty confident that their movement want cause motion blur.

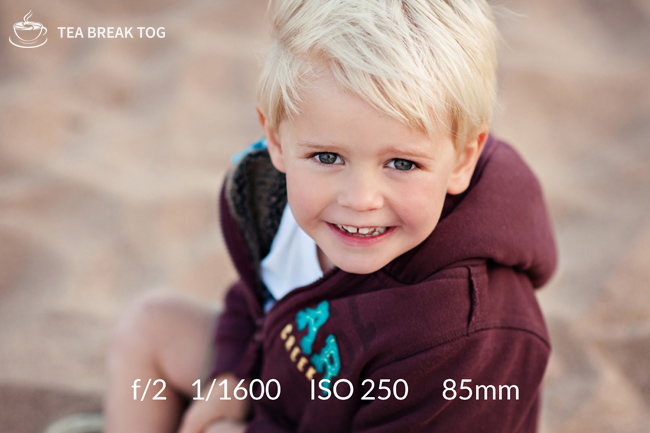
Focus where it matters
If you are trying to focus and recompose with people and a very shallow depth of field – good luck to you. The best way to focus in these scenarios is with single point or dynamic focus (Nikon) or manual selection (Canon). Move your focus point to exactly where you want maximum sharpness.
This matters much more the closer you are to your subject. For a close-up portrait the sharpest part of that image should be the eyes. So move your focus point to the nearest eye. If they are level then it doesn’t matter which eye you choose. If your depth of field is very shallow and you focus on the nose – bang go those eyes and bang goes your portrait.
Try back button focusing too – if you persevere you won’t go back!
If you are shooting groups with a wide aperture and a shallow depth of field then don’t get yourself in too much of a tizz about where to focus. If you are closer then focus on the face of the middle person or where two middle people are touching. If you are further away you can worry even less. Just focus on someone!
Good stance and grip is vital
How steady you hold that camera is so supremely important! I see beginners all the time wobbling their equipment about all over the place and then wondering why their image is blurry.
Think about your stance and your grip every single time you take a photograph and then eventually it will become second nature. Just pause for a second each time and examine your technique. Then pull it all in and take the shot.
Whilst you are honing this – take double shots. I used to do this all the time when I was shooting with a shallow depth of field. I took two shots. If I missed sharpness on the first I would often manage it on the second. Something to try if you are struggling!
Another tip is to find things to lean against. Anything you can anchor yourself with will help you keep that camera steady and those images sharp!
I hope these tips help you when shooting with a shallow depth of field. There are other things to consider when aiming for sharpness in general – you can read about them here.
For now I would love to hear your thoughts! How do you get on shooting with very wide apertures? Do you have any further tips?
Hit me up on twitter or Facebook and let me know!
The post 5 tips for sharp images at wide apertures – Ep.32 appeared first on Tea Break Tog.
From The Podcast
Tea Break Tog Photography Podcast
Do you want to improve your photography but are turned off by all the jargon, tech and science? Do you struggle to find the time to develop your skills?My name is Julie Christie and I host the Tea Break Tog photography podcast. My show aims to deliver straight-forward photography lessons, tips and chat to you every week. Episodes are short and focused meaning this is learning that will fit easily around your busy schedule. Let me help you to take control of that camera and capture stunning images!For more information visit www.teabreaktog.com. To get in touch simply click the contact tab on the website or tweet me @TeaBreakTog!Join Podchaser to...
- Rate podcasts and episodes
- Follow podcasts and creators
- Create podcast and episode lists
- & much more
Episode Tags
Claim and edit this page to your liking.
Unlock more with Podchaser Pro
- Audience Insights
- Contact Information
- Demographics
- Charts
- Sponsor History
- and More!

- Account
- Register
- Log In
- Find Friends
- Resources
- Help Center
- Blog
- API
Podchaser is the ultimate destination for podcast data, search, and discovery. Learn More
- © 2024 Podchaser, Inc.
- Privacy Policy
- Terms of Service
- Contact Us