How to use back button focus and why you should! – Ep.23
How to use back button focus and why you should! – Ep.23
How to use back button focus and why you should! – Ep.23

In this episode I am going to be talking solely about back button focusing. I have had lots of questions about it and I wanted to dedicate a whole episode to it. I am going to explain to you what it is, why it is so fabulous and exactly how you do it for best results. As always, this is a podcast and is best consumed via the audio. But for those readers amongst you we have kindly provided text below!
But first, Happy New Year! It has been 2016 for 11 days already – which I am struggling to get my head around but I am so excited about what the year has in store for Tea Break Tog and absolutely thrilled to be back working and planning. I have so much content coming up for you guys and I hope you will join me for the ride.
2016 has had a pretty soggy start here. As you can tell from my accent I am Scottish and it has basically rained almost solidly for a month. I’m definitely affected by weather. If it is dark and dreary for too long I start to feel a bit like that too so together with the rest of the UK I am more than a little sick of it to be honest. However, when it came to choosing a Thursday Theme for the facebook group last week the obvious answer was of course, RAIN! And I’ll tell you there have been some great entries already – I am so impressed. Obviously we have members from all over the world so not everyone is suffering with wet, miserable weather like us poor Brits but that isn’t stopping everyone from getting involved. Something that members are noticing having been out photographing in the rain is that there are actually plenty of interesting image opportunities using reflections, condensation on windows, water droplets on foliage and umbrellas just to name a few. I’m really looking forward to seeing more over the course of the week! It makes all this rain a little more bearable!
But on with the subject of today’s show – back button focus!
I have only been using back button focus for a year or two but honestly, when I switched over, I couldn’t believe it had taken me so long to try it. It’s a game changer and I am going to convince you of that in this episode!
Maybe you have been using back button focus and you are just not getting to grips with it or you used it once and hated it. I am going to urge you to listen to this episode because it may be that there was just something you were missing. There are a few things you need to know to use it to great effect.
Let’s start with what it is. What does it mean to back button focus?
So if right now you do not use back button focus then that means you use your shutter button to focus. You frame your scene and then you bring it into focus by pressing lightly down on your shutter button and then to take the photograph you press your shutter button fully down. It is a two-step process but you are using one button right?
Well if you choose to use back button focus you will no longer be able to focus your scene with the shutter button. All that button will do is take your photograph for you. That is all. So you will expose and compose your scene the way you usually do and then to bring it all into sharp focus you will press a button on the back of your camera. Once you have achieved sharp focus, only then do you press the shutter button to take the photograph.
Now what I am not going to do today is teach you how to change your camera settings so that you can use back button focus. You guys are all using a hundred different camera models and that would be impossible to do. If you want to find out how to switch to back button focus on your particular camera just google it. Go to google and type in your make and model of camera followed by ‘back button focus’ and you will find out how to do this pretty quickly. If you don’t manage to then write a post in the facebook group and we will help you. If you are not a member already – get yourself on there.
So I am sure you can imagine when you first start focusing with the back button – you forget! Of course you do. It has become a habit to focus with the shutter button and you have to break that habit.
When I am showing learners how to back button focus I am amazed at how some of them want to give up after a few minutes. What I hear is ‘I’ll never get used to this’ or ‘This isn’t for me’. After a few minutes!!!
Naturally, this will take a bit of getting used to. Be patient!
But I assure you, a day of shooting will be all it takes! Just one day of shooting and you will not look back. Yes, there will be some frustrations when you realise that you have tried to focus with the shutter button and your image is blurry. But how many times do you think you are really going to do that before getting it right? Not many, let’s be honest. And remember, if you are looking through your viewfinder at your scene you are going to see that it isn’t in focus most of the time and that will be a trigger for you to remember that you need to use that back button.
What I recommend is that you do not try this for the first time when the images matter. That is a mistake. So if you are taking photographs for someone, whether it is a family shoot, a graduation or even a wedding – perhaps trying out back button focus for the first time is not the best idea!
What I suggest is that you go out with the sole purpose of learning and practicing back button focus.
If you make that the focus of the session (excuse the pun) then you are more likely to; 1. Remember to use the back button, and 2. Achieve success!

Now if you thought that was all there was to it you would be wrong. I talk to lots of photographers who are aware of back button focus but when they gave it a try they couldn’t make friends with it at all, even when they persevered. When I chat to them I quickly realise it is because they don’t actually fully understand how to use it. That is what I am going to teach you now. Because there’s no point making a change like this unless you actually know how to use it to achieve the best results possible right?
So let’s say you have researched how to switch your camera to back button focus and you have made the change. Now what? Firstly, with many cameras you are going to need to be in continuous autofocus mode to use back button focus accurately. So make sure you also switch your autofocus mode to ‘continuous’. Those of you using Canon – this will be called AI Servo.
Now you practice.
Practice with a person because you are going to want to practice with a still subject and a moving subject.
Let’s talk about back button focus with a still subject first.
Let’s say you have a willing subject and you place them in some window light to take a portrait.
Now most of us will place our subject slightly to the side of our frame rather than in the centre. (I am going to be talking about why photographers do this in detail on the podcast very soon but, for now, let’s just assume that is what most of us would do.)
There are two camps when it comes to how we focus. Some of us like to ‘focus and recompose’ and some of us like to move our focus point to the exact place in the scene we want to focus on. I will deal with each of these in turn.
If you are someone who focuses and recomposes (meaning you keep your focal point in the middle, focus on your subject then, keeping your finger half pressed down on the shutter button, you recompose the scene placing your subject off-centre) then you are going to love back button focus straight away! That is because, with back button focus you will be able to do all of that with much less hassle and more assurance of a sharp subject.
So let’s say your subject is on a chair near the window and all that gorgeous window light is illuminating their face. You have posed them and you are ready to take the shot. Those of you who focus and recompose will still keep your focus point in the centre as usual. Now the eyes are the most important part of this scene so you will place your focus point right over the eye of your subject. However, this time, instead of pressing halfway down with your shutter button to focus, you will press your back button once to focus. You don’t keep it pressed. Press and release. As soon as you release your focus is locked on the eye leaving you free to move your camera ever so slightly to place your subject off-centre. As long as you don’t press that back button again, your focus should remain locked on the eye. Now that is only if you have been very careful and made only soft, slight movements with your camera.
Remember, focusing and recomposing is a subtle affair.
You can’t move your camera backwards or forwards and expect that the eye will still be in focus. It is slight movements sideways or up and down that work here.
So let’s say you have made that subtle movement with your camera and your subject is now nicely off-centre and you are ready to take the photograph. You do not touch that back button again because you want focus to remain on the eye. Now you simply press the shutter button and the photograph will be taken. This is much easier than trying to keep your finger half pressed down on the shutter button isn’t it? I mean how easy is it to lift that shutter finger by accident? You will have a much higher success rate doing it this way and you won’t have to hold down any focus lock buttons either. Easy!
So that is for those of you who focus and recompose. If you are a regular listener you will know that I don’t actually recommend focusing and recomposing and I always encourage learners to select their focus point. This means you can move it to exactly the place in your scene that you want to be sharpest. If you would like to know more about how to do that – listen to episode 10.
So let’s say that is you. You would place and pose your subject and you would compose the frame placing them slightly off-centre. You would then move your focus point to their eye. Once you were happy with your composition and where you are focusing you would press your back button to focus the scene. Again, just press and release. Once happy that the scene looks sharp through your viewfinder, you are then free to take your photograph by pressing the shutter button.
For both camps – those who focus and recompose and those who select their focus point – as long as your shutter speed is fast enough and your technique is good then the eyes of your subject should be sharp. If they are not, try again. If you are still having trouble with sharpness then check out episode 11 to troubleshoot ‘out of focus’ images.
Now you might be thinking, ‘ok that sounds alright but nothing earth shattering. Nothing that really convinces me that back button focus is so much better than focusing with the shutter button.’
But just wait…
Because when back button focus really comes into it’s own is with a moving subject.
Honestly this will change everything for you if you have never used it before!
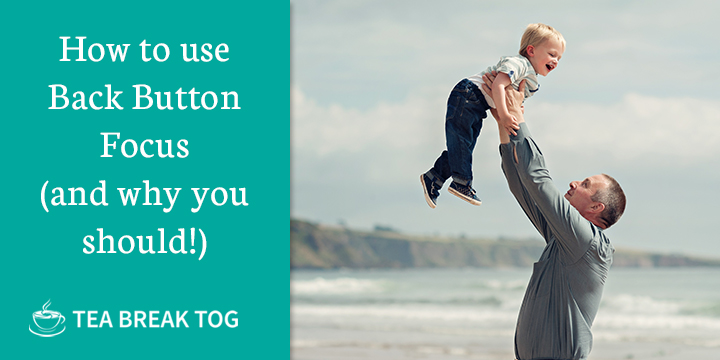
The first time back button focus really blew my mind was when I was capturing a family in the park. If the kids are young and light enough I often ask mum or dad to throw them up in the air a bit and I would capture the expressions and the connection. It is a shot I love.
However, up until then, I had always accepted that at least 50% of the images from a set like that would be out of focus. Simply because the child is being thrown so quickly and is moving up and down constantly. If I am taking shots in rapid fire and trying to focus with the shutter button I know that by the time I have pressed it to focus and then pressed it to take the shot that the child might have moved to a completely different part of the scene. It’s the same with ‘jumping on the bed’ shots. I love them but you need a great technique to get consistent sharp shots! A fast shutter speed will help and continuous autofocus will also help but even with both of those – you will still miss lots of shots if you focus with the shutter button in situations like these.


Now if I use back button focus and a fast shutter speed I can confidently take a continuous burst of frames of a dad throwing his toddler up in the air over and over again and I can rely on a high percentage of them being sharp.
Here is how it works;
So let’s say you now take your subject outdoors with you to a local park. Firstly you find an open area where they can run towards you. Let’s say you place them 100 metres in front of you and you ask them to wait until you say and then run towards you.
Now with someone running towards me I am going to be making sure my shutter speed is fast. I would probably want a minimum of 1/400 of a second but if I could get faster I would obviously be delighted.
If you are wondering how on earth you know what your exposure settings should be then you should definitely check out my free beginners course.
So let’s say you are all set. Once again, you compose your scene and place focus over your subject’s face this time (they are too far away for you to worry about the eyes). This time you are still going to focus the scene with your back button but you are going to keep it pressed down the whole time you are taking photographs.
So press down to focus, yell to your subject to start running towards you and keep that back button pressed whilst you take as many photographs as you want using the shutter button.
Here is the thing though, you have to keep that focus point trained on your subject. You can’t get lazy. Technique is so important. How you stand, how you hold your camera, how you balance and keep everything steady and smooth.
All of this cannot be overemphasised regardless of how you focus!
So as long as your shutter speed was fast enough and you have kept your focus point trained on your subject the whole time you should have lots of sharp images in that set. Because when you keep the back button pressed down like this and you are in continuous or AI servo mode, your camera will continuously refocus on your subject wherever they go as long as you keep the focus point trained on them.
But it is easy to keep your focus point trained on a moving subject that is moving towards you. You don’t really have to move, do you? That becomes a little trickier when moving subjects are moving across your scene.
But, with back button focus this also shouldn’t be a problem.
So this time, you ask your subject to start at one side of your scene and run across to the other side.
Now focusing and recomposing with fast moving subjects who are moving across your frame is really almost an impossible thing to do so I am going to assume that you are not even going to attempt to do that. You will either have to select your focus point or you will be forced to keep your subject in the centre of your frame which isn’t ideal. Let me elaborate…
Ideally in a shot like this you will have space in front of your subject to run into. So, for example, if your subject is running from left to right you would place them off-centre to the left and have space to the right for them to run into. If you can’t focus and recompose (because it will just be too tricky with your subject moving in this way) then you have no choice but to have them in the centre where your focus point is.

There is another reason to stop focusing and recomposing and start selecting your focus point! Remember, episode 10 is where to go for more on that.
Ok – back to back button focus! So this time you do the same as before. Place your subject and ask them not to start running until you say. Get your exposure right, get your composition right, make sure your shutter speed is nice and fast and then when you are ready – press the back button to focus your scene. This time you keep it pressed again and yell to your subject to start running across your scene.
As long as you keep that focus point trained on their face and as long as you keep that back button pressed down, your camera will continue to refocus again and again on your subject and when you look at the set of images at the end you will be stunned at how many are sharp.
That is, of course, assuming you paid attention to your technique.
So with that last one you have to be well practiced at moving your camera in a subtle, steady way to follow your subject. Big, jerky movements don’t work. It is all about the ‘smooth and slight’!
And that is how you use back button focus!
No more of this trying to hold your shutter button halfway down whilst you recompose or try to follow a moving subject – this is actually so difficult to do for extended periods of time and the chance of your finger slipping is high!
No more switching between single autofocus mode (AF-S or One Shot) and continuous autofocus mode (AF-C or AI Servo). With back button focus you simply keep your camera in continuous mode all the time because you are in control of this with the back button.
‘Press and release’ for stationary subjects (AF-S/One Shot) or ‘press and hold’ for moving subjects (AF-C/AI Servo).
I really do hope you will give it a try. More than that though, I hope that you persevere! Those who do reap the rewards of pin sharp images!
I have to warn you about entry-level Nikon DSLRs and back button focus. Your back button will have another function alongside focusing. When you are previewing your images on the screen and you want to protect one (so that you can’t delete it by accident), you can press the back button and it does this for you.
The reason I mention this is because if you try to use the back button to focus but you still happen to have an image preview on your screen then the back button will not focus – it will lock that image and make it ‘read-only’ instead. So just make sure you have no images on your screen when you are shooting. 
Thank you to Sue Nixon in our facebook community for alerting me to this!
I would love to hear from you on this. Leave me a comment below telling me about your experiences with back button focus or asking any questions at all. I reply to them all. Alternatively, you can tweet me @TeaBreakTog and we can connect there instead and chat about BBF! Let me know your thoughts.
I will be back in a couple of days to start some chat about composition and how to get those scenes looking great in the camera. I hope you will join me!
The post How to use back button focus and why you should! – Ep.23 appeared first on Tea Break Tog.
From The Podcast
Tea Break Tog Photography Podcast
Do you want to improve your photography but are turned off by all the jargon, tech and science? Do you struggle to find the time to develop your skills?My name is Julie Christie and I host the Tea Break Tog photography podcast. My show aims to deliver straight-forward photography lessons, tips and chat to you every week. Episodes are short and focused meaning this is learning that will fit easily around your busy schedule. Let me help you to take control of that camera and capture stunning images!For more information visit www.teabreaktog.com. To get in touch simply click the contact tab on the website or tweet me @TeaBreakTog!Join Podchaser to...
- Rate podcasts and episodes
- Follow podcasts and creators
- Create podcast and episode lists
- & much more
Episode Tags
Claim and edit this page to your liking.
Unlock more with Podchaser Pro
- Audience Insights
- Contact Information
- Demographics
- Charts
- Sponsor History
- and More!

- Account
- Register
- Log In
- Find Friends
- Resources
- Help Center
- Blog
- API
Podchaser is the ultimate destination for podcast data, search, and discovery. Learn More
- © 2024 Podchaser, Inc.
- Privacy Policy
- Terms of Service
- Contact Us